

Welcome to Trimble's Toy Emporium . Established in 1880 by proprietor Mortimer P. Trimble !
Finally I have finished work on the outside of my shop and the finishing touch was the shop sign.
"Trimble's Toy Emporium ? " you may well ask , "isn't the toy shop called Belle's Emporium ?"
Well that is the name for the stories I am writing set in this very special old Toy Shop.
Belle lives there with old Uncle Mortimer , but of course Uncle Mortimer has owned this shop for many years and it is his name above the shop.
But, more of that later .
For now lets talk about the building itself.
My cunning plan to disguise the wiring worked............eventually !
I've never kept it secret that I am a bit of a bodger. Things usually come right in the end but through sheer luck rather than miniature building skills. I do learn from my mistakes and you might too, I certainly made enough of them this week !

Here we have the first step of the cunning plan. I decided that foam board would be the best material for the back panel which would hide the wiring of the house . I cut it to shape with a stanley knife and pebble dashed the top to match the rest of the house.
So far, so good !

I glued the out house in place on the foam board and cut a hole out for the wiring to come through inside.

I then taped all the wiring in place ready for me to glue the panel on.
While the foam board was flat on the table I glued on the brick slips and left it to dry over night.
Problem one soon made itself known. The glue had warped the foam board which dried with a definite curve.
Problem one soon made itself known. The glue had warped the foam board which dried with a definite curve.
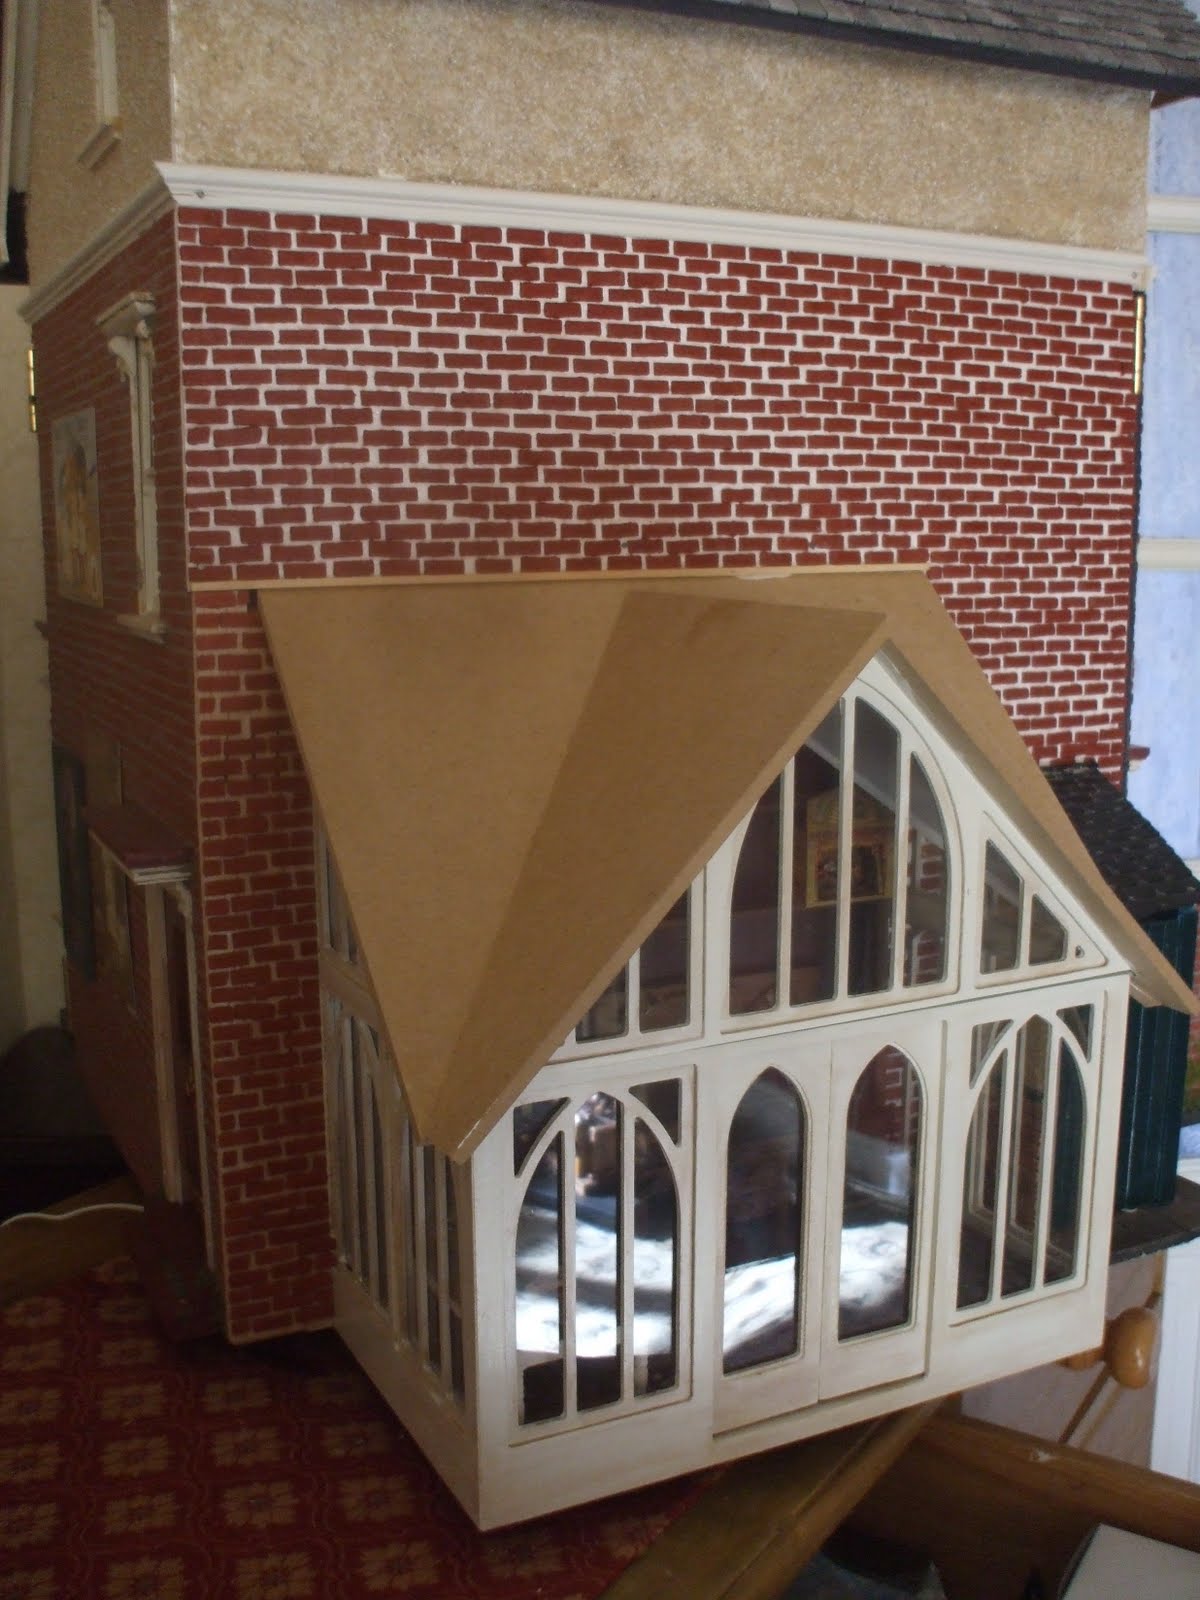
Not one to be beaten I glued the back of the panel as planned ( pulling the wires through the hole in it and into the outhouse) and attached it to the back of the house. I had some very small nails and knocked those in round the edges and magically all warping dissappeared and I ended up with this rather perfectly fitting back panel.
I was thrilled and left it to dry.
This is when problem two reared its ugly head.
Now when I was taping my wiring down I checked every one to see that the lights and sockets all worked.
Yet now when I plugged them in nothing at all worked !!!
I couldnt figure it out . Then I unplugged them all and plugged in just one and that worked.
I tested every one in this way until I got to the wire leading from the kitchen light. There was a blue flash and everything went off again.
I unplugged it and everything worked . I knew right away what I must have done, I must have knocked one of those nails though the kitchen light wire !!
Of course now the panel was now glued firmly in place . I have had to remove the kitchen light and now need to replace it.
However I have a cunning plan to hide the wire when I finally get one sorted out ..............

To cheer myself up I did a little work inside the work shop. It is still quite bare but taking shape and I am very happy with it so far. I have a huge list of things that must go in here but for now this is how it looks.

I used a piece of balsa wood tomake a tool rack for the back wall.

There will be an old stool at the table where Uncle Mort sits to paint the toys.

This is the shop now completed from the front. I love the shop sign. Its slightly wonky, and a bit distressed and exactly what I wanted ! I simply used word art in my microsoft word programme and some free clip art then printed it out on linen paper . I glues this to the sign board and then stippled on a little burnt umber paint with a dry brushing technique to age it up.

Here you can see the street light is working ! I need to hide the base of this with some greenery as I dont like it but the rest of it is just right.
You can also see here my lovely St. Bernard pulling a buggy. This is from Roberson's and I fell in love with it when I saw it at Scottish Miniatura so had to buy it .

Finaly here is the back of the house with the grouting in place and the roof tiled. I have just glued on the moss and it needs to be brushed off a bit when dry sowont be quite as obvious as this when I am finished.
The bricks , tiles and grout were from http://www.minaco-uk.com/ really lovely products to work with at a reasonable price and Graham who runs it is very helpful.

Just a few finishing touches now to the interior decor and the Emporium is ready to be filled up !
julie xxxx


32 comments:
Glorious! What a lovely bldg with a history. You will solve your lighting problem, I am sure.
Fantastic and well worth waiting for! I love the fact that you've added the workshop to the back which gives a fair bit of interest round that side and despite the hiccups, your cunning plan seemed to work. I had to smile, you sounded just like me when tackling lighting - it's just never straightforward. I can't wait to see more of the inside now that you've given us a taster with outside. Love it!
Jilie, OMG....I LOVE this building! Was this a kit or did you build it from scratch? It is so wonderful! I love everything about it. Perfect hiding place for all of your wires. I can't wait to see the shop filled! Your St. Bernard dog and the cart are great!!
ooops.....you know I meant Julie. I was too excited when typing.....LOL
BEAUTIFUL! I love the way the building looks like now! Great great work Julie! The story of making the lights on is briliant!It made me simlile:)I am sure your cunning plan will work for the kitchen light too! I love the shop sign!
Thanks Susan, my lighting plan involves drainpipe and fingers crossed !
Hi Irene I couldnt believe this house had a turntable yet nothing at all on the back wall. Seems daft not to use it and I'm really pleased with it now. As for lights LOL they could drive anyone mad couldnt they !
LOL Patty thats okay ! This is a kit house , the Sid Cooke Empire stores and one I have wanted for ages. Its been a lot of fun getting it to this stage :0)
Hi Ewa , I certainly had fun and games sorting those lights out and it made my husband laugh too, I was so baffled !
julie xxx
Hello Julie,
The toy emporium is looking great now. The answer to your warping problem is that, if you laminate something together, you must do both sides as when the glue dries, it pulls the side laminated towards the glue, hence the curve. We`ve all done it.
Kindest Ian
www.agentlemansemporium.blogspot.com
Julie, the toy shop looks great. I would like to shrink myself and walk through it :-)
What a fabulous shop Julie, you have worked such magic on that kit! I hate lighting hence most of mine have none lol! I love all the extra fixtures you have on all sides, gives it so much more interest!Now the extra fun bit and ill look forward to the finished tour of the interior! Kate xx
It's all magnificent and I love it! I LOVE your sign and I've never seen such a realistic one! :o))
I love it all to bits and from the inside out and wish it were mine! lol :o))
I see the St Bernard and the cart from Roberson;s too, I see what you mean now! I can't wait to get my little treasure from them!
Michelle xxx
It looks wonderful Julie. The shop sign has come out so well, it looks truly authentic. I can't believe it is straight from the computer.
All the little touches are really bringing it together. The work bench area is superb.
this shop is absolutely fabulous! it is truly amazing, and like Tabitha said: Glorious!
I can see that you poured many many hours of love and labour into it, it truly shows!! just stunning!
It is looking fabulous Julie.I love the name, it feels right!! Bodging is the way to go!lol Love Jain xx
Hi Ian ! now you tell me LOL
Luckily all was well that ended well :0)
Hi lara, I always want to do that in dolls houses,wouldnt it be fun !
Hi kate,the lights arent my favourite bit either , no copper tape for me LOL I do it the easy way but its so worth putting them in as it looks magical at night .
Have tried to email you kate as didnt get your email, think we have an email problem LOL
julie xx
It's looking fantastic! I really love the work shop!
Hi Michelle, thank you ! You would have laughed if you had seen my first sign attempt with stick on transfers......Luckily this one fits the bill !
bet you cant wait for your special delivery from Robersons, I love their prams and buggies !!
Hi janice,
I plan toreally fillupthat work area,you cant see it but there are shelves high on the wall and there willbe ladders to reach them .
I have a very very ancient Charles dickens book called "the cricket on the hearth" which has illustrations of an old toymakers abode and that is my inspiration. More of that another day :0)
Hello Anneke, thank you :0) we lost our wee cat this week and working on this has been great therapy and kept me busy and distracted.
I think though with allof us our miniature houses are labours of love !
Hello Jain ,yes definitely more "Bodgitt and leggit" than Mulvaney and Rogers LOL but its getting there and I'm loving it :0)
julie xxx
Hi Shannon ,Thank you !
julie xxx
Wooo!!!!
It's a Fantastic Shop!!
What a wonderful shop... your work is excellent!
The whole building looks perfect Julie so your technique must work in the end. It looks so realistic and has such character.
This is such a special project and its wonderful to look at now, cant wait till everything else is done.
Lorra Luffies
Debie xxxxx
Julie, I find wonderful the shop front and the sign.
The small lab is fascinating. It is projected into the wonderful world of Mr. Mortimer :-)
Mini hugs, flora
Hi Julie
I have so enjoyed watching the building of Trimble's Toy Emporium. What an absolutely fantastic dollshouse you have now and it has been an inspiration for me seeing how you went about everything. Please keep the pictures and details coming as you fill it though.
You have given me so many ideas for my next house.
It's amazing how you described it at the beginning and it has grown almost exactly as I imagined it would.
Like Lara, I would love to shrink myself down to size and walk through it.
Well done. It is definitely a dream property.
Joyce
this is just beautiful! I love every bit of it! And how clever you were to hide all of the wires! I am having an issue of that right now. The work room is looking fabulous as well! hugs, ara
I don't even remember you painting the house at all ;)and lo and behold, you are now opened for business until the kitchen lights are fixed :). Such a pain isn't it everytime a light does not work?
This toy shop is going to be featured of course :). But you know which room is my favourite don't you? Yes, it's the workroom! It is my dream workshop with all the old fashioned tools and a space where I can dirty with all my wood shavings :). Love love love it!
I haven't been here for a while, and this building became wonderful!!
Congratulations!
You've done a fantastic job! Well done.
I had the same problem as you with foam board warping. I used it for the false wall in my day nursery room box and after it was wallpapered it dried in a perfect curve. I've had to glue wooden braces onto the back to straighten it out.
Bit of a bodge but it works!
Julie it all looks wonderful. I really love the work bench you brought, its fantastic. x
Love it...Just wonderful!!!
Maravilloso trabajo. Espero que el pequeño problema de la luz se haya solucionado.
Te ha preocupado de muchos detalles. Enhorabuena. Besos Clara
wow, all I can say is that I am truely impressed. you make me want to hurry up and finish my dolls so I can do a house that's been stuck inside my head for months!
very good job indeed
Marisa
Me encanta, es perfecta. Muy entrañable, te ha quedado genial.
Post a Comment